Mascara on the bottom lashes creates a stunning effect, like when applied to the upper lashes. Applying mascara to your bottom lashes can take some getting used to, especially if you’re more accustomed to applying it to the top lashes only.
Applying Mascara to Bottom Lashes
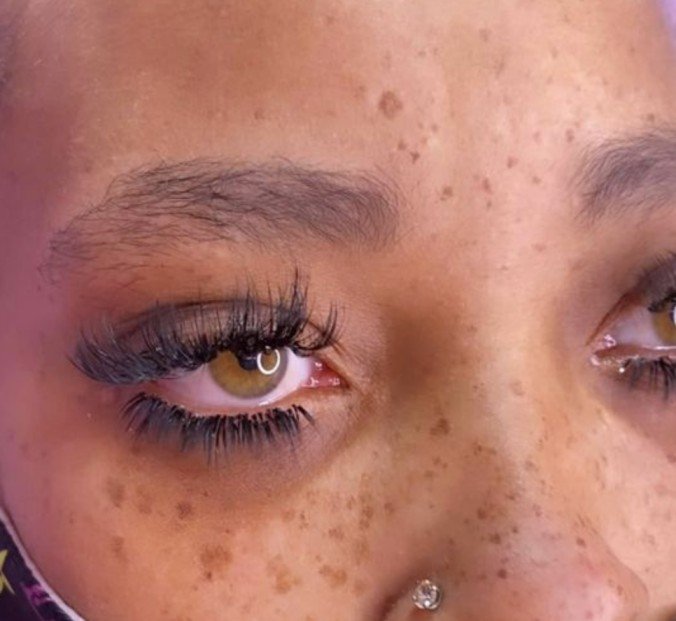
This guide on applying mascara will help you get the most out of your lower lash application while also keeping your mascara looking great in general!
1. Start with a clean face
Before you even think about putting mascara on your bottom lashes, make sure you start with a clean face. You don’t want any makeup or oil getting in your way as you work. This is where a waterproof mascara comes in handy—it gives you an added layer of security against raccoon eyes!
If you’re using regular mascara, try starting with a makeup remover wipe first and use your fingers to gently rub away any oil from around your eyes (this will also help soften your lashes and make them easier to apply mascara). Now that nothing is stopping you, let’s get started!
2. Curl your lashes before applying mascara
Curling your lashes or lash extensions before applying mascara not only opens your eyes but also lifts your lashes off of their root, making mascara application much easier. You can use an eyelash curler for maximum curl, or try rolling a clean mascara wand over your lashes once for a more natural look.
Be sure to rub between each coat: It’s easy to forget about your bottom lashes when you’re concentrating on applying mascara to your top ones.
Be sure you don’t miss any spots by rubbing any excess mascara from one eye onto another lash line with a cotton swab (or by giving it a second pass with another clean mascara brush). And don’t forget about those tiny inner-corner lashes either!
3. Use an eyelash curler
Applying mascara to bottom lashes can create some awesome drama and if you don’t have much length down there, it can do wonders for making your lashes look fuller. However, it’s important not to skip an eyelash curler or eyelash brush. It will prevent little tears from forming as well as clumps and odd wisps that aren’t very flattering at all.
Use a spoolie: To separate each lash, use a spoolie brush after you have applied your top coat of mascara. Spoolies are wonderful because they help remove any clumps and help make sure every lash gets covered evenly without needing additional coats. So, make sure you keep one on hand so you can get those bottom lashes done right!
4. Brush bottom lashes up and out
This gives a more natural look, rather than just smearing mascara on and hoping for the best. Use a brush: Using an eyelash curler at home can help with curling but many professional makeup artists use brushes like those used for eye shadow application.
These brushes are made from much finer bristles, allowing for fuller coverage of your lashes without clumping. Find one that feels comfortable to you and that works well for your bottom lashes. Once you find one you like, apply pressure when applying so there’s no tugging or pulling.
For many, a rounded tipped brush works best as it helps place the product evenly over all lashes. Do your top lash line first: When applying mascara overall, start with your top lashes, then move on to the bottom ones.
5. Apply mascara in short strokes
After you’ve applied a primer or base coat, draw your bottom lashes in short strokes. This technique will help to avoid smudging and create more defined eyes.
It’s important not to go overboard with mascara on the bottom lashes; if you try too hard it can clump. Be sure to use shorter, lighter strokes as your work up close and then lengthen as you get farther away from your eye.
6. Cover each lash individually
To apply mascara to your bottom lashes, first decide which eye you want to work on, or ask a friend or partner for help with even application.
Begin by swiping an eyelash curler over your top lashes, holding it there for a few seconds before releasing. This step is optional but will help your bottom lashes look thicker and more prominent when they’re curled up against long top lashes.
Next, apply two layers of mascara to your upper lashes while making sure you cover each lash individually. When both sets of lashes are coated, wait at least thirty seconds so that everything dries before applying mascara on your bottom ones.
7. Let it dry completely before opening your eyes
This is crucial. If you don’t let your mascara dry completely, it can cause eye infections and, yes, even result in blindness. Hold off on opening your eyes until you’re sure you’ve been mascara-free for at least a few minutes.
If you find yourself with some mascara still clinging to your lashes after a few minutes, try using baby oil or olive oil to dissolve any remaining makeup. Then wait a few more minutes and dab some more oil on, if necessary, before opening your eyes.
Special tips for Mascara on bottom lashes
- Start with a clean brush. Dip the brush into the mascara and then tap it on the side of the container to remove any excess.
- Apply the mascara to your bottom lashes in a small area. This will help to avoid getting any on your skin. Be sure to use a light hand when applying the mascara. Too much mascara can make your eyelashes look clumpy.
Because bottom lashes are harder to reach, ensure you take your time applying mascara. Not only can you easily get mascara on your face by moving your wand around too much, but if you miss a spot, it’s easy for any errant mascara from the top lashes (which should have dried) to transfer onto them.
If you think about it ahead of time, it makes more sense than risking smearing color all over your eyelids! We recommend using waterproof makeup remover or coconut oil to help remove any mistakes.